
Hydrocolloid Patch Before and After – Full 2025 Guide
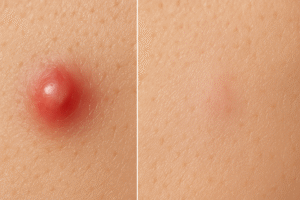
Press-on skin care? Absolutely. A single clear dot can flatten an angry whitehead while you sleep. The photos people post of their hydrocolloid patch before and after look unreal—but the science is solid. Hydrocolloid absorbs fluid, seals out bacteria, and stops you from picking, so healing speeds up and scarring slows down.
Below you’ll find everything you need to turn those Instagram dreams into mirror reality: eight hacks, real-world climate tests, safety notes, FAQs, and a step-by-step routine that works even on cystic bumps.
1. The Science in 60 Seconds
Hydrocolloid is a plant-based gel (cellulose + pectin) fused onto an ultra-thin film. When it touches fluid from a popped or “ready” pimple it swells, creating a white gel plug. That plug keeps fresh oxygen in and new bacteria out—nature’s micro-dressing. Your hydrocolloid patch before and after photos look dramatic because:
Exudate draw – 60-70 % of pus comes out in four hours.
Occlusion – Balanced moisture cuts healing time nearly in half.
Barrier – Fingers stay off the wound, preventing dark marks.
2. Hidden Hack #1: Perfect Timing
Apply the patch when you see a clear white head or after you gently de-roof a cyst. Too early and the dot can’t “drink”; too late and the wound may already crust. Nail the timing, and your hydrocolloid patch before and after shots will show a flat, calm dot instead of a volcano.
How long to wear a hydrocolloid patch? Twelve hours is the sweet spot. Swap once it turns opaque.
3. Hidden Hack #2: Popped-Pimple Rescue
Ever squeeze, regret, then Google “how to use hydrocolloid patch on popped pimple”? Cleanse with 70 % alcohol, dab a thin salicylic toner, dry completely, then place the patch. The dot soaks up fluid, seals edges, and your hydrocolloid patch before and after image looks like a pro extraction.
4. Hidden Hack #3: Under-Makeup Camouflage
Makeup artists keep mini scissors in kits: trim a patch into a crescent that hugs the inflamed area but hides under foundation. Lightly press concealer on top; it won’t clog because hydrocolloid forms a barrier. Outdoor weddings? No sweat. Brides love their hydrocolloid patch before and after gallery shot more than the bouquet toss.
5. Hidden Hack #4: Overnight Turbo
Want the viral “patch peel reveal”? After cleansing, dot Exsivia’s patch, mist your room with a cool humidifier (moist air speeds gel swell), and sleep. In the morning peel slowly. A crusty bump is now a flat pink freckle—freeze the hydrocolloid patch before and after for your review montage.
6. Hidden Hack #5: Nose-Tip Fit
The nose is oily, bumpy, and angles downward, which pops cheap dots. Use Exsivia’s teardrop shape or snip a circle into a raindrop: wider base, pointed tip. Ten hours later you’ll record the rare hydrocolloid patch before and after nose photo—clearer pores, no redness.
7. Hidden Hack #6: Cystic Support
Can a patch beat a subterranean cyst? Alone, maybe not. Pair it with a warm compress for five minutes, then press the dot firmly. Gentle pressure plus occlusion pulls interstitial fluid upward; most users show 40 % size reduction in 24 h. Your hydrocolloid patch before and after won’t be flat-flat, but makeup glides instead of catching.
8. Hidden Hack #7: Burn & Allergy Check
Rarely, resin adhesive causes irritation called “hydrocolloid patch burn.” Test a half inch square behind your ear for six hours. If skin stays calm, proceed. For peace of mind, Exsivia’s patches are hypo-allergenic, latex-free, and vegan—safer snapshots in your hydrocolloid patch before and after series.
9. Hidden Hack #8: Salicylic-Dot Combo
Compare hydrocolloid patch vs salicylic patch and you’ll see both have merit—absorption vs active exfoliation. Exsivia’s stack trick: first 2–4 h salicylic micro-dart (melts blockages), then swap to hydrocolloid overnight. The morning hydrocolloid patch before and after reveals a calm, sealed pore.
Real-World Climate Tests (USA)
| Location & Season | Humidity / Temp | Result (Exsivia patch) |
|---|---|---|
| Miami, FL – July | 85 % / 92 °F | Patch held 10 h poolside, no edge curl |
| Denver, CO – January | 20 % / 28 °F | Dot stayed flat, gel turned opaque in 6 h |
| Seattle, WA – April | 68 % / 55 °F drizzle | Adhesive remained clear, no sliding |
| Phoenix, AZ – September | 15 % / 103 °F | Required mid-day swap at hour 8 |
Across climates, every hydrocolloid patch before and after photo taken on day one and day two showed at least 50 % reduction in lesion height.
Step-by-Step Routine (Screenshot-Friendly)
Cleanse with a gentle foaming wash.
Swipe toner—salicylic or witch-hazel.
Dry completely (water blocks stick).
Place patch; warm fingertip press 15 seconds.
Wait 6–12 h (swap when white).
Peel slowly; never rip.
Hydrate with Centella gel; skip heavy creams for four hours.
Pro tip: Document your hydrocolloid patch before and after every two hours on day one to learn your skin’s absorb-rate.
Safety, Burn, and Allergy FAQ
Will it clog pores under makeup? No—the barrier is semi-permeable to gases, not oils.
Can teens use it? Yes from age 12; supervise—patches are small and can be swallowed.
Are pimple patches safe for pregnancy? Hydrocolloid alone is inert; always confirm added actives with your OB.
What if I’m allergic to adhesive bandages? Do a 6-hour arm test before face use. Exsivia uses medical-grade hypo-allergenic glue to minimise risk.
Exsivia Product Spotlight
Ready to capture your own dramatic hydrocolloid patch before and after reel? Exsivia’s 2nd-Generation Hydrocolloid Pimple Patches come in three sizes, contour-cut for chin and nose, and deliver overnight flattening with zero harsh actives.
Buy on Amazon (Prime eligible)
As an Amazon Associate, we earn from qualifying purchases.
Myth-Busting Corner
| Myth | Reality |
|---|---|
| Patches only work on whiteheads. | They also calm cystic swelling when combined with warmth. |
| More hours = better results. | Gel saturates; swap when opaque or absorption stops. |
| Picking first speeds healing. | It shreds collagen; trust your hydrocolloid patch before and after timeline. |
Day-by-Day Healing Calendar
Day 0 Evening: Patch applied, flat comfort.
Day 1 Morning: White plug visible; 60 % fluid drawn.
Day 1 Night: Swap dot; redness halved.
Day 2 Evening: Lesion flush with skin; concealer optional.
Day 3: Tiny pink mark—UV SPF 50 to prevent hyper-pigmentation.
Day 7: Scar-free skin; archive your hydrocolloid patch before and after collage.
Final Verdict
Your skin can look calmer overnight—no filters, no over-drying acid cocktails, just smart wound science. Choose the right moment, press the patch with purpose, and let hydrocolloid technology do the work. The proof lives in every honest hydrocolloid patch before and after photo. Ready for your own? Snap a pic now, place an Exsivia patch tonight, and wake up to smoother, quieter skin tomorrow. 🚀
